
Categories
Path Of Exile

Best Starter Builds for Path of Exile 3.28 League

Starting a new league in Path of Exile is always a race against time—how fast you progress early on often determines how quickly you reach endgame content. That’s why choosing the right league starter matters so much. The ideal build should be easy to gear, efficient through the campaign, and capable of scaling into maps and boss fights without requiring heavy investment.

With Patch 3.28 shifting the meta once again, some builds clearly stand out for their consistency and early power. Before breaking them down, it’s worth understanding what makes a starter truly strong.

A top-tier league starter typically has low reliance on expensive uniques, clears the campaign quickly, handles early maps smoothly, deals reliable single-target damage for bosses, and transitions well into higher-tier content without hitting a wall.

Here’s how the current standout builds compare.

Top-Tier Starters
Explosive Arrow Ballista Elementalist

This build continues to be one of the safest and most reliable choices. It revolves around placing ballista totems that stack explosive charges on enemies, eventually triggering powerful ignite damage.

Its main advantage is how little risk is involved—you can deal massive damage from a distance while your totems do the work. Even with minimal gear, it performs exceptionally well in boss encounters, making it a go-to option for players who want early access to endgame farming.

Poisonous Concoction Pathfinder

Poisonous Concoction remains a standout because it eliminates one of the biggest early hurdles: weapon upgrades. Since the skill doesn’t rely on a weapon, gearing becomes far simpler during the campaign and early mapping.

The build offers strong clear through poison stacking, and its synergy with flasks provides solid survivability. It’s an excellent all-around option for players who want a smooth, low-stress progression path.

Lightning Arrow Deadeye

Lightning Arrow is all about speed. With the ability to clear large packs of enemies almost instantly, it’s one of the best builds for early currency farming.

Deadeye enhances projectile performance, allowing the build to scale efficiently even with basic gear. While its boss damage isn’t as strong as some alternatives, its mapping speed makes it incredibly effective for building early wealth.

High-Tier Options
Boneshatter Juggernaut

For players who enjoy melee combat, Boneshatter remains a dependable choice. Although the skill involves self-damage, Juggernaut’s defensive strengths help mitigate that drawback.

This build is exceptionally tanky and can handle difficult encounters without much risk. Its clear speed improves as gear progresses, and it offers solid single-target damage for boss fights.

Cold Damage over Time Occultist

Cold DoT builds focus on consistent damage rather than burst, making them reliable and easy to manage in longer fights. They perform well during leveling and don’t require expensive gear to feel effective.

With strong defensive tools and steady damage output, this build is ideal for players who prefer a slower, more controlled playstyle.

Situational Picks
Righteous Fire Inquisitor

Righteous Fire is popular for its simple gameplay—activate the skill and burn everything nearby while sustaining your own health.

It performs well in early mapping and is easy to pick up, but it typically requires more investment to remain effective in higher-tier content. As a result, it’s better suited for players willing to commit resources later on.

Summon Raging Spirits Guardian

Minion builds are often reliable league starters, and this one offers solid boss damage while keeping the player relatively safe.

However, minion behavior and scaling can sometimes feel inconsistent, which holds it back compared to higher-tier options. Still, it’s a viable choice if you enjoy a summoner playstyle.

Regardless of your build, early currency generation is key to progressing efficiently. Advancing through the Atlas, targeting mechanics like Essences, Expedition, and Harvest, and focusing on consistent farming routes can significantly improve your income.

Upgrading important gear slots—especially weapons, jewelry, and six-links—can dramatically boost your performance. Many players rely on trading early in the league to secure these upgrades quickly, while others focus on crafting and resource farming to build strength over time.Don’t let POE currency be a roadblock—MMOexp has got you covered.

A strong league starter should naturally lead into your long-term goals. Most builds will eventually fall into one of three roles:

A fast mapper designed for efficient currency farming
A boss-focused setup for tackling pinnacle encounters
A stepping stone used to fund a second, more expensive build

Your ideal choice depends entirely on how you prefer to play. Some builds prioritize safety and boss damage, others focus on speed and farming efficiency, and some offer durability for close-range combat.Unlock infinite possibilities by harnessing the power of buy Path of exile currency from MMOexp!

Picking the right starter sets the tone for your entire league, so it’s worth choosing something that aligns with both your goals and your playstyle from the very beginning.
Categories
Diablo 4

Complete Guide to Silent Chest Locations in Diablo 4 Season 12

In Diablo 4, not all loot containers are created equal. Among the many treasure sources scattered across Sanctuary, Silent Chests stand out as a unique and often overlooked opportunity to earn valuable rewards, including Diablo 4 Gold and powerful Diablo 4 Items. Understanding how these chests work, and more importantly, where to find them, can significantly improve your efficiency during Season 12.

What Are Silent Chests

Silent Chests are special locked containers found exclusively in the open world. Unlike regular chests that you can open instantly, these require a Whispering Key to unlock. Without a key in your inventory, you won’t be able to interact with them at all.

Visually, Silent Chests are easy to recognize once you know what to look for. They are wrapped in glowing golden chains, making them stand out from standard wooden or iron chests. However, despite their distinct appearance, they are often missed because of their placement.

These chests never appear inside dungeons or instanced areas. Instead, they are hidden throughout the overworld, typically along walls, cliffs, or tucked beside environmental obstacles. Their off-path positioning means that players rushing through zones often ride right past them.

General Spawn Behavior

While Silent Chest locations rotate, their regional spawn zones remain consistent. This means you won’t find them in fixed coordinates, but you can reliably search specific areas where they are known to appear.

Because of this semi-random system, efficient routing is key. Instead of wandering aimlessly, players should focus on high-probability zones and follow optimized paths to maximize their chances of finding a chest quickly.

Fractured Peaks Locations

Fractured Peaks is one of the most active regions in the game, which makes Silent Chests here harder to find simply because other players often loot them first.

Gale Valley: This is one of the fastest zones to check. Its compact layout allows for a full loop in under two minutes. The chest frequently appears near the southern entrance where the path narrows.

Frigid Expanse: A much larger area where chests tend to spawn near northern cliffs. Stick to the perimeter rather than crossing the center to improve efficiency.

Desolate Highlands: Easily accessible from Nevesk, this zone often features spawns along the eastern side of the main road, especially near ruins or rock formations.

If you’re starting your session, checking Fractured Peaks early can give you an advantage before other players clear the area.

Kehjistan Spawn Areas

Kehjistan’s desert terrain can make Silent Chests harder to spot, but it offers a major advantage: lower player traffic.

Caldeum: Look beyond the main city routes. Silent Chests typically spawn in outer districts, especially near side alleys and the eastern gate.

Scouring Sands: Focus on the northern section near clusters of ruins. The sandy environment can obscure the chest’s glow, so move carefully and keep your camera angled for better visibility.

Because fewer players farm these areas, chests here often remain available longer, increasing your chances of success.

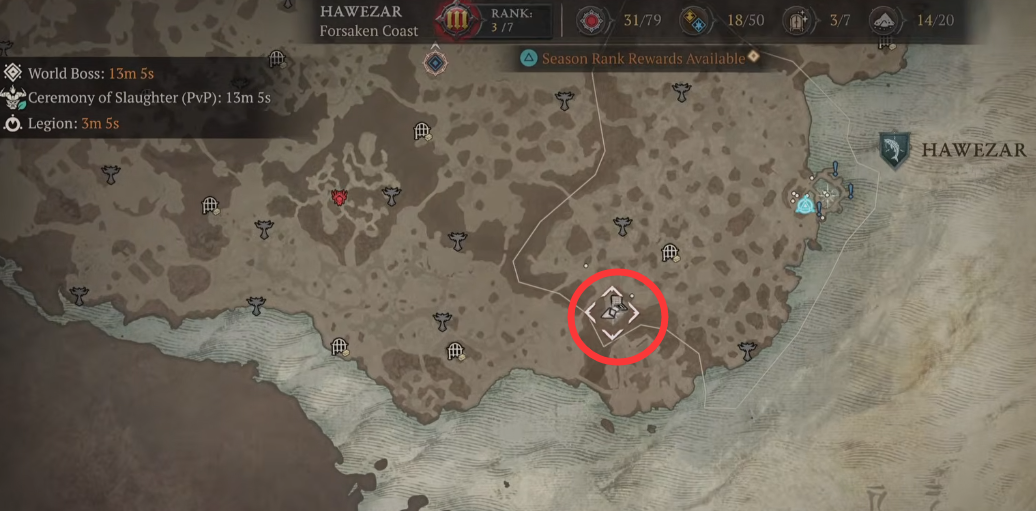
Hawezar Farming Spots

Hawezar is another excellent region for Silent Chest hunting due to its relatively low population.

Fethis Wetlands: This is one of the most reliable zones for finding untouched chests. Look along water edges and small elevated patches within the swamp.

If you’re searching mid-session and struggling to find a chest elsewhere, Hawezar is a strong fallback option.

Dry Steppes Community Discovery

One of the most consistent Silent Chest spawn points discovered by the community in Season 12 is located in the Dry Steppes.

North of the Bear Tribe Waypoint: This elevated rocky area has been widely reported as a reliable spawn location. Because it sits slightly off the main road, many players overlook it.

Community reports suggest a high success rate when repeatedly checking this spot, making it one of the best targeted farming locations this season.

Helltide Zones: The Best Opportunity

If you want the highest chance of finding a Silent Chest, Helltide events are your best bet. These time-limited events naturally encourage players to explore large portions of the map, increasing the likelihood of discovering hidden chests.

During Helltides:

Silent Chests often spawn near Mystery Chest locations.

They frequently appear along the outer edges of the zone.

Running along the perimeter, commonly called “kissing the wall”, is one of the most effective strategies.

Helltides also provide better overall loot, meaning you can farm Diablo 4 Gold and collect valuable Diablo 4 Items while searching for Silent Chests at the same time.

Tips for Efficient Silent Chest Hunting

To maximize your success rate, keep these strategies in mind:

Always Carry Whispering Keys: Visit the Purveyor of Curiosities and stock up so you’re never caught unprepared.

Check Low-Traffic Areas: Regions like Hawezar and Kehjistan often yield better results due to fewer players.

Use Mount Speed Boosts: Faster movement allows you to cover more ground and check multiple spawn points quickly.

Combine Activities: Hunt for Silent Chests while completing other objectives like Helltides or Tree of Whispers tasks.

Final Thoughts

Silent Chests may seem like a small part of Diablo 4’s massive world, but they play an important role in seasonal progression and reward optimization. By learning their spawn patterns and focusing on high-probability zones, you can consistently find them without wasting time.

Whether you’re chasing Smoldering Ashes, farming Diablo 4 Gold, or hunting for rare Diablo 4 Items, integrating Silent Chest routes into your gameplay is a smart and efficient strategy for Season 12.

Categories
Diablo 4

How to Obtain Pounds of Flesh in Diablo 4

In Diablo 4, endgame progression revolves around acquiring rare materials, powerful gear, and large amounts of Diablo 4 Gold. One of the newest and most important boss materials introduced in Season 12 is Pounds of Flesh. This resource is essential for players who want access to some of the most powerful Diablo 4 Items, particularly unique gear tied to challenging boss encounters.

If you’re aiming to push deeper into Torment difficulties and maximize your character’s power, understanding how to farm Pounds of Flesh efficiently is crucial.

What Are Pounds of Flesh

Pounds of Flesh are a special boss material tied to Bloodied activities in Diablo 4. These activities were introduced as part of Season 12’s endgame content and are designed for high-level players. In most cases, you’ll need to reach at least Torment I difficulty before you can begin farming this material effectively.

This requirement ensures that players are properly geared and prepared, as the enemies and encounters associated with Bloodied content are significantly more dangerous than standard activities. However, the rewards are well worth the effort, as Pounds of Flesh are directly tied to obtaining some of the strongest Diablo 4 Items available.

Bloodied Activities Explained

The primary way to obtain Pounds of Flesh is through Bloodied activities. These include special versions of Nightmare Dungeons, Infernal Hordes, and Lair Boss encounters that are enhanced with unique modifiers.

The key to accessing these activities lies in Bloodied Sigils and Blood-Soaked Sigils. These are special dungeon keys that come with the “Bloodied” affix, which dramatically increases the difficulty of the content.

Bloodied Sigils increase enemy strength by one Torment tier above your current level.

Blood-Soaked Sigils are even more challenging, featuring enemies comparable to those found in high-end Pit 100 runs.

These modifiers make encounters far more intense, requiring optimized builds, strong defenses, and efficient damage output. However, they also increase the chances of obtaining valuable rewards, including Pounds of Flesh and high-tier Diablo 4 Items.

How to Get Bloodied Sigils

Before you can farm Pounds of Flesh, you’ll need to obtain Bloodied or Blood-Soaked Sigils. Fortunately, there are several ways to acquire them:

Torment-Level Enemy Drops: Enemies in Torment difficulties have a chance to drop these sigils randomly. The higher the difficulty, the better your chances.

Seasonal Reward Caches: Completing objectives on the seasonal bounty board often rewards caches that can contain Bloodied Sigils.

General Endgame Farming: Activities like Nightmare Dungeons and elite farming routes can indirectly help you obtain sigils while also earning Diablo 4 Gold and gear upgrades.

Because sigils are somewhat RNG-dependent, it’s a good idea to engage in multiple activities rather than relying on a single farming method.

Alternative Method: Kurast Undercity Runs

Another way to obtain Pounds of Flesh is by completing runs in the Kurast Undercity while using a Tribute of Titans. This method provides a different approach compared to Bloodied activities.

However, there’s a trade-off. While you can earn various boss keys through this method, the rewards are spread across multiple bosses. This means you may not receive enough Pounds of Flesh specifically for the encounter you’re targeting.

Even so, this method is still valuable for players who want to diversify their farming routes while collecting additional Diablo 4 Items and materials.

Where to Use Pounds of Flesh

Once you’ve gathered enough Pounds of Flesh, you can use them to access one of the most challenging boss encounters in the game: the Butcher’s Hoard inside The Broiler dungeon, located in Gea Kul.

This is not the same Butcher you might encounter randomly in Nightmare Dungeons. Instead, this is a significantly more powerful version with enhanced abilities, new attack patterns, and dangerous environmental mechanics.

The fight demands careful positioning, strong survivability, and high damage output. Players who underestimate this encounter are likely to be quickly overwhelmed.

Rewards from the Butcher’s Hoard

Defeating the empowered Butcher and opening his treasure hoard gives you a chance to obtain several powerful unique items. These rewards are some of the most sought-after Diablo 4 Items in Season 12, offering unique mechanics that can redefine builds.

Some notable drops include:

Blood-Mad Idol: Grants permanent Berserking at the cost of taking increased Burning damage, while also boosting damage output during the effect.

Wendigo Brand: Rewards consistent combat performance by increasing damage and maximum life based on kill streaks.

Wyrdskin: Enhances crowd control effects by applying Vulnerable and Weakened statuses, increasing damage dealt to enemies.

Rustbitten Dirk: Offers massive bonuses against isolated enemies, making it ideal for single-target builds.

Thousand-Eyed Reaver: Improves mobility and combat efficiency by granting Ferocity stacks that boost movement speed and overall effectiveness.

These items can dramatically enhance your build, making the effort to farm Pounds of Flesh highly worthwhile.

Tips for Efficient Farming

To farm Pounds of Flesh effectively, focus on improving your overall efficiency. Speed and survivability are key factors in completing high-difficulty content.

Optimize Your Build: Choose a build capable of handling Torment-level enemies with ease.

Increase Mobility: Faster movement allows you to clear content more quickly and farm more efficiently.

Balance Risk and Reward: While Blood-Soaked Sigils offer better rewards, they are also significantly harder. Make sure your character is ready before attempting them.

Farm Consistently: Combine multiple activities, such as Bloodied runs and seasonal objectives, to maintain a steady flow of resources and Diablo 4 Gold.

Final Thoughts

Pounds of Flesh are a crucial material for players looking to unlock some of the best endgame rewards in Diablo 4. By participating in Bloodied activities, farming sigils, and challenging powerful bosses, you can steadily build up your supply.

While the process can be demanding, the payoff is substantial. Not only will you gain access to top-tier Diablo 4 Items, but you’ll also accumulate valuable resources and Diablo 4 Gold along the way. With the right strategy and persistence, farming Pounds of Flesh can become a core part of your endgame success.

Categories
MLB The Show 26

MLB The Show 26 Team Affinity Update Explained

MLB The Show 26 brings a fresh layer of depth to Diamond Dynasty this year, with major changes to how Team Affinity works. The addition of Captain Cards and a revamped Diamond Reward system encourages players to think more strategically about roster construction, rather than simply stacking the highest-rated players.

A New Direction for Team Affinity

Team Affinity remains a central progression system in Diamond Dynasty, but its role has become more meaningful. Instead of passively collecting players, you’re now rewarded for committing to a specific MLB franchise and building around it.

By using players from the same team, you’ll unlock unique rewards, complete themed objectives, and steadily climb toward higher-tier bonuses. The system is designed to reward consistency and team identity, pushing players to develop lineups with purpose rather than randomness.

Captain Cards:The Core of Your Lineup

One of the biggest additions this year is the introduction of Captain Cards. These special cards act as the foundation of your squad, offering powerful boosts that directly influence your Team Affinity progress.

What makes Captain Cards important:

Teamwide boosts:They enhance the attributes of players from the same MLB team in your lineup.

Unique perks:Some captains unlock abilities that standard cards don’t have.

Scaling bonuses:The more players from the same team you use, the stronger the captain effect becomes.

Choosing the right Captain Card is a major decision. A well-matched captain can significantly increase your efficiency, helping you earn rewards faster while also improving your in-game performance.

Diamond Rewards:High-End Incentives

The updated Team Affinity system introduces Diamond Rewards as the ultimate milestone. These are premium-tier unlockables that reflect both your dedication and how well you optimize your roster.

What you can expect from Diamond Rewards:

Elite player cards
Rare collectibles and items
Exclusive cosmetics and upgrades

These rewards are no longer just about grinding—they’re tied closely to how well you build and manage your team.

How to Earn Diamond Rewards Faster

Progressing efficiently through Team Affinity requires a mix of smart decisions and consistent gameplay. Here are the key approaches:

Commit to one team:Focus on a single MLB franchise to maximize synergy and progression speed.

Align your captain:Make sure your Captain Card matches your chosen team to fully benefit from bonuses.

Complete team objectives:Participate in challenges, events, and milestones tied to your roster.

Stay active in modes:Playing regularly in Diamond Dynasty events and programs accelerates your progress.

Players who want to speed things up can use stubs to acquire key players, but smart lineup building is still the biggest factor.

Smart Strategies for Team Affinity Success

To get the most out of the new system, long-term planning is essential. Instead of constantly swapping players, build a cohesive squad and refine it over time.

Focus on depth, not just star power

Balance your lineup to cover all positions within one team

Regularly check your progress and adjust accordingly

Combine gameplay modes to stack rewards efficiently

This approach ensures steady advancement while keeping your team competitive.

The updated Team Affinity system shifts the focus from individual ratings to team chemistry and strategy. Players who commit to a clear plan will see better results than those who simply collect random high-tier cards.Step up to the plate with confidence—get your MLB The Show 26 Stubs from MMOexp and build the ultimate Diamond Dynasty roster today.

Key improvements include:

More strategic roster building

Meaningful rewards for team loyalty

Better competitive performance in events and ranked play

The evolution of Team Affinity in MLB The Show 26 makes Diamond Dynasty more engaging and rewarding than ever. With Captain Cards shaping your lineup and Diamond Rewards offering top-tier incentives, success now depends on how well you build around a team identity.Turn every swing into a home run with MMOexp reliable cheap MLB The Show 26 Stubs service—your shortcut to building a championship team.

Master the system, stay consistent, and you’ll not only unlock better rewards—you’ll also field a stronger, more competitive squad.

Categories
FC 26

FC 26 Season 6 Pass Guide: Make Your Idol, EVOs & Player Picks

Welcome, lads! It’s season six time, and with it comes a fresh start filled with exciting new content. This season’s pass is packed with unique options, including the Make Your Idol feature, some amazing EVOs, and a bunch of tradable packs. If you’re looking to enhance your squad quickly, don’t forget to buy FUT 26 Coins. Let’s dive into the new season!

The Free Pass Breakdown

The free pass has some solid rewards this time around. Let’s go over some of the highlights:

1. Make Your Idol

This is one of the biggest additions of the season. EA has rolled out a Build Your Own EVO system where you can choose a player from either Korea or Japan and evolve them throughout the season. You’ll be able to unlock unique upgrades and fine-tune the card to your liking. Definitely worth checking out, and I’ll be doing a separate video on it soon, so stay tuned for the best player picks and tips.

· Base Rating: 89

· Evolution Options: Play styles up to 9, allowing you to customize the card as you level it up.

· Overall, this is a great addition to the free pass and could be a game-changer if you pick the right player for your squad.

2. EVO and Packs

The first few levels come with a mix of packs and EVOs that make grinding worth it. Here’s a quick look at some notable rewards:

· Level 4 – A solid EVO choice, increasing play styles and adding more customization options. The evolution of certain base play styles is a fun addition, especially for creating hybrid cards.

· Level 7 – A 1083 tradable pack and some neat EVOs. Players like Gabby Nunez and an 89-rated EVO for a higher stat boost round out the rewards.

· The EVOs this season are more spread out, but they’ve focused on making the early ones more versatile. Some might seem underwhelming at first glance, but when used properly, they could be useful in longer chains of gameplay.

The Premium Pass Breakdown

Moving to the premium pass, there are some exciting rewards to look forward to. Some of the best rewards are found here, especially the high-rated player picks and additional EVOs. Let’s break down the most exciting features.

1. EVOs

The premium pass really shines when it comes to EVOs. You’ll find some solid player upgrades scattered across the levels. There are quite a few +2 overall boosts, but they come with additional benefits, like increased stats for specific skills or play styles. Some of the highlights include:

· Level 10: A powerful defender-focused EVO with up to nine defensive play styles available.

· Level 15: Players like Edison, the two-paced keeper, and Deinia, who’s got five-star skills and a great in-game feel despite her stats.

· Level 25: Oliver Khan in goal. This EVO keeper is a throwback, but with good play styles, he could become a solid choice.

2. Player Picks

At level 12, there’s an exciting Foot Birthday player pick. These are awesome because you can pick from a range of players, potentially getting your hands on some insane cards. The level 20 options include Son and Kim, who are both standouts in terms of their play styles.

· Son: A 92-rated left winger with four-star skills and five-star weak foot. He could be a game-changer for any Premier League squad.

· Kim: A center-back with every defensive play style and two key passive play styles. He’s got the potential to be a defensive powerhouse.

3. Packs and Other Goodies

· Level 15: A multi-player pack with two decent Brazilians, Deinia and Edison, who can offer decent value in the early stages.

· Level 29/30: At the end of the season pass, you’ll have a chance to grab a Ronaldo or Landon Donovan with the usual high-rated stats. Even though they miss out on some key play styles, these players still bring a lot to the table, especially with their skill sets.

Additional Notes:

· Packs: There are plenty of tradable packs scattered throughout the pass, which adds great value if you’re looking to build your squad with a mix of high-rated players.

· Daily Objectives: You’ll be grinding for SP to level up your players quickly. These can be achieved through matches and specific challenges.

Is the Premium Pass Worth It?

In all honesty, the premium pass isn’t as powerful as last season’s, but there’s still plenty of value here. The EVOs are fun, and the player picks are decent. You’ll also get some top-rated packs and tradable rewards. The biggest downside is the lack of elite play styles for some key players—Ronaldo, for example, is missing several essential ones, which could leave him a little underwhelming.

My Verdict

If you’re an avid player looking to collect unique EVOs and get some high-rated player picks, the premium pass is worth it. However, if you’re hoping for a massive improvement over last season’s pass, this one might not deliver the same level of excitement. For those looking to quickly improve their squad, you might want to consider buying cheap EA FC 26 Coins from MMOEXP to boost your gameplay. For free pass players, the Make Your Idol and the selection of solid EVOs make it an interesting season to grind through, so definitely don’t miss out on those early rewards.